Sunday, July 27, 2008

Miniature Gardens


Well I'm almost packed and tomorrow we venture out to Beautiful British Columbia. Looking forward to lots of inspiration. My Mom suggested this post so this ones for you mom......
I have always been fascinated with miniatures. My favorite ride at Disneyland is the boat thru storybook land, so about 4 years ago I started making miniature gardens. This is the end of school gift that I give to my children's teachers each year.
I paint the houses which are meant for Christmas Village sets. Instead of snow drifts I paint in moss or plants around the house. Churches also make a good setting.
When I paint them I find if you antique them with a little burnt umber and floating gel you get a really nice look. After painting make sure you use 2-3 coats of good outdoor proof sealer.
I was hoping to give you a close up view of the house but I have given all mine away. Maybe I'll do a tutorial next year.
When I'm buying the houses (.....you got to think ahead now as they are usually on sale in the Fall) I also pick up the little benches. It helps set the scene in the garden.
I then find a nice flat shaped rock and paint a little sign for the house, something like 104 Liliput Lane, or Elfwood Manor, Fairystone Cottage...you get the picture.
You then need a good container that is not too deep but gives you a large planting area. I add a rock pathway and some small flowering plants.
Enjoy
The little school for the teacher was a big hit!
see you next time,
gail

Saturday, July 26, 2008

How to make Flowers from Wool Roving

Well its been very busy around here. We are leaving for the family cabin in BC on Monday and I am frantically trying to pack enough art/craft supplies for the kids(...and of course me!). CABIN CRAFTS......I try to think ahead with some planned nature type stuff but you really never know what the kids will be in to.


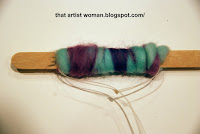
My oldest and I have been making these wool roving flowers.


I have carded roving lying around because I like to felt and use it to stuff dolls and stuffies with. We have been planning to make a felt landscape similar to the work of Karma Grotelueschen. Felt landscapes have always fascinated me, must be because i like to paint landscapes as well.


We are making these flowers for the foreground of the landscape. Needle felting and kids don't seem to go together very well. I have enough problems not poking myself with those incredibly sharp and long needles so I thought it would be better to make them this way. I am using the technique described in this book: More Magic Wool, with my own alterations.


You will need lengths of carded wool roving. I have dyed mine with good old kool aid, (works every time with wonderful colors).


You also need a needle and thread, some masking tape, scissors, and something to wind your flower on to. In this case i am using a Popsicle stick which gives me a 1 inch flower.


a ruler = 3 inch flower


a tongue depressor = 2 inch flower


a mini craft stick = 1/2 inch flower


take your needle and thread and tie a knot in a 10 inch or so double length of thread.


tape the knotted end on one end of the stick and tape down the thread on the other end. This stops it from moving around and makes it easier for your kids.

Now you need to wind your wool roving around your stick. I chose 2 different colors for my flower but you can easily just use one. Wind about 6 or 7 times around and try to tuck the ends in. Break off any extra at the end as you don't want to be tucking in a big long piece.


take off the tape and thread the needle between the 2 threads near the knotted end.


Pull on the thread and when the wool has scrunched up slide off the stick.


continue to pull the thread till the flower forms and stitch a few stitches thru the center of the flower. Don't knot off just yet cause we'll put a center on our flower


take a small piece of roving and tie a couple of knots in the center, clip off the ends


place in the center of the flower and secure with a few stitches. knot off your thread and there you go a wool roving flower. If you're doing a landscape like me then only 30 or so more to go.

I'll post the finished piece when we get back.


I will be taking my laptop to the cabin so hopefully i can post some good cabin crafts and paintings. (fingers crossed that the Internet access works!!)

see you later,
gail

Wednesday, July 23, 2008

Another Day Another Painting


It was supposed to be a rainy day today but low and behold the sun came out. A perfect opportunity for another practice session on the deck.

Found my reference photo....decided to do another fish. Made my sticker again and started painting. In the background were out of focus coral formations and plant life.


When finished the background off with the sticker to concentrate on the fish and the details.

I found this one difficult due to the iridescent detail on the photo. I thought I was done and had all the border tape taken off except the bottom when I decided that the area under the fish needed to be darker.


After I scanned this painting into the computer I checked my values by converting it to black and white. Low and behold I was missing a really light value so this painting is a bit flat.

Well that's why I keep practicing.


5x7 140lb wc paper
See you next time,
gail

Tuesday, July 22, 2008

Mountain Painting and Making your own Sketchbook

Well I'm still trying to paint daily but sometimes the kids have their own ideas. Was very hot yesterday so we ended up going to a local outdoor pool. Too crowded to sketch or paint as I had to keep my eye on the kids.


Here is a daily practice painting I did a few days ago from a reference photo. I was trying to capture that pink glowing sky. It was in my store bought sketchbook so the quality is not as good as it is on Bristol paper instead of wc paper.


It is really hard to find a good quality wc paper sketchbook. It usually has inferior paper and is very expensive. So a couple of times a year I make my own. The binding is very important. I prefer a ring binding for ease of movement and it allows me to use both sides of the paper. I cut my paper to size. This time I am adding a sheet of good quality Bristol between each wc sheet for thumbnails or sketches. I add a cover and a thick cardboard back , (use the back of the pad of paper you cut to size).

Then I take my little piles of paper to Staples where they bind it for me for about $3.50 per book. The more books I make the less it costs per piece. Ta Da! perfect wc sketchbooks custom made for me.

Anyway thanks for reading,
gail

Sunday, July 20, 2008

How to do Batik with Kids


During the school year I needed to find a kid friendly batik idea. I had done wax batik with kids before but it can be a bit difficult using hot wax. It also is not much fun having to iron away the wax with lots of newspaper. I had heard about glue batik with white glue but the results were disappointing. I stumbled on this blue glue idea and I LOVE IT!!!


It is now the talk of the school because it is so user friendly. So lets get started:


You need this type of glue..Elmer's Galactic Glue. They also sell a non glitter version which I think will work as well just make sure it is the washable blue gel. I got mine at Micheals but I know they also carry it at Wal mart. Right now is a good time to stock up with the school supply sales on. UPDATE Sept 09/08 I tried the Elmer's Washable School Gel Glue (it's still blue) and it works even better, finer nozzle, easier to squeeze, washes out faster.

I used 5 bottles for 24 kids and we were able to do 3 projects with it.


I cut my fabric to size and I have a layer of wax paper underneath.

Draw your image straight on to your fabric with your glue bottle. For the butterfly I lightly pencilled in my design first. The pencil marks come off in the wash stage.


When finished let dry completely about 12 hours.


Now you get to add color. Instead of using fabric dye which could wash out the glue prematurely I use watered down acrylic craft paint. You can almost achieve a watercolor like effect with it. I don't use fabric paint because it costs more and it only has a bit of softener in it. This works better.


Having fun painting (Jeff age 5).

Make sure you use an art shirt to protect your clothes.


When finished painting let dry completely. Depending on the weight of your fabric this might take a few hours.


When dry you need to soak your fabric in a warm (almost hot) water bath. Depending on the fabric's weight this soak can be anywhere from 10 minutes to 1/2 an hour, (heavier fabrics take longer). I use the bathtub because it works best for a large number of pieces. Don't worry about the paint coming off you will only get a few flakes of dried color in the water.
To help it along you can also scrub it a bit with a nailbrush.

When the glue is all off the fabric wring out your piece and dry. I use the dryer because I'm impatient and with 24 pieces I wanted it done.


Sew up into your finished project. In this case Jeff wanted a pillow for his room.


This is one of the projects I did with the school for Father's Day, homemade windsocks. I used very light fabric (polyester lining material) for this one.

We also did a name sign out of heavy canvas for all the kids.

In both cases the blue glue batik worked terrific!!

Give it a try the possibilities are endless. You could make flags, banners,tote bags,custom shirts or just a nice wall hanging.

see ya later
gail

Thursday, July 17, 2008

Daily Painting

I was able to get some daily practice in today. The reference photo is a Monarch sitting on some flowers. The flowers and leaves are out of focus on the photo with the butterfly taking center stage.


I fussed over the background longer than I should have, so much for being loose.


When background was dry off with the custom sticker.


I then focused on the butterfly. The painting is pretty tight due to the amount of detail in the wings. Oh well .... every time I practice I learn something. In this one I would of changed the background. I'll try that next time and make it larger 11x15 I think.


5x7 140lb wc paper


See you next time..... I'm working on a good tutorial for kid friendly batik.


gail

Tuesday, July 15, 2008

Procrastination


Trying to finish a piece that my niece comissioned but having difficulty getting it to flow....so I'm on the computer instead.


Haven't done a daily practice painting yet but I thought I'd post one of my parrot practice pieces from last month.
gail
11x15 140lb wc paper

Monday, July 14, 2008

One way to mask

I thought I try to do a tutorial today. Here goes nothing.

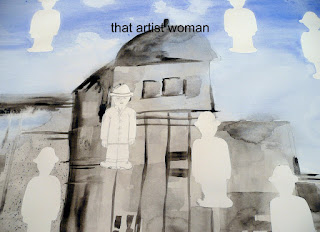
Near the end of the school year, one of the Grade 5 teachers asked me to do a lesson on surrealism, specifically to have the kids paint their own copy of Rene Magritte"s Golconde. Well I fussed awhile over how I was going to do this.

They needed to mask several duplicate shapes. That way they could do a light airy background with watercolor washes and then do more detailed work in the masked areas with colored pencils, markers, etc.

Masking fluid for 28 kids was just not practical given the amount of area needing to be reserved. Asking them to preserve their whites with their brush skills in multiple areas identical in shape was also not going to fly, I could see the tears already.

Tape seemed the only practical approach but we couldn't use exacto blades to cut our shapes. Normally you place tape down on your area, sketch out your shape and then using a blade cut away the excess without harming your paper.

So I came up with this masking tape sticker idea. It works so well I use it now for all my paintings where I need a large masked area or where I require a very clean line.


You need painter's masking tape, it can be green or blue(green is cheaper). Take a piece of wax paper and lay several pieces of tape on the wax paper. DO NOT PRESS FIRMLY DOWN, light touch only or else you'll have a tough time removing your custom made sticker.


With pencil draw the shape you require to mask off. If your shape is larger than the width of the tape just overlap 2 or more pieces. I outlined these with marker so you can see them.


Then you cut out the image with scissors including the wax paper backing. If you want multiplies of the same image you can use it as a template and trace around it.


When you are ready to use your sticker remove the wax paper backing...


and stick onto your paper or canvas. Now you can press FIRMLY and make sure you get all the edges.


Paint over your sticker while you lay down your background washes.


Let your background dry completely...you have to resist the urge to peel off your sticker too early. Once fully dry carefully pull off your sticker to reveal your pristine white area.


Now you can add color to your image to finish your painting. The masking sticker gives you a nice clean edge around your image to play with instead of trying to paint in your background after the fact.


And here is the finished painting which also qualifies for my daily practice for today!!
5x7 140lb wc paper