Sunday, May 31, 2009

Father's Day Card


Here is a Father's Day card I couldn't resist putting on the blog. Brought to my attention by one of the Kindergarten Moms (thanks Larissa!) this will be the card Kindergarten will be making.


Materials Required:


template, you can use mine here

cardstock or posterboard around 8"x14"

sharpie marker

tempera paint

scissors

glue stick

foil


Using the template trace out your saw shape onto your posterboard. Outline with sharpie.


Find a window....trace the outline onto the other side in pencil. Take off of window and retrace your lines with the sharpie.


Paint the handle for the inside of the card. PLEASE NOTE: for some strange reason I did this backwards for these photos...for a proper card the handle should be on the left side.


When dry turn over and paint the handle and saw part...REMEMBER it's backward on this picture..handle should be on the right. Here I'm painting it all brown put you can paint the saw part grey or blue if you want.


Tear off a piece of foil that is as long as the saw part of the card.


Using the glue stick coat the inside saw with glue...go past the serrated ends to make sure your foil will be fully glued down before you start cutting......(remember picture is backwards..handle should be on left)


Place foil shiny side up onto the the glue and smooth...turn over and start cutting. You will have to trim the foil where the handle meets the metal part of the saw on the inside of the card.

Cut out the inside part of the handle.

Using the sharpie write on your message

HAPPY FATHER'S DAY on the front of the card

TO THE GREATEST DAD I EVER SAW! on the inside.....the sharpie works great on the foil.

That's it

Sorry I haven't posted much this past week but I have been trying to get my garden planted. Here in Calgary we are FINALLY safe to plant...we've had a very cold spring.

see you next time

gail

Wednesday, May 27, 2009

Dinosaur Murals


Well we continue with Dinosaurs this week in Kindergarten.

To convey the sheer size of these creatures I had the kids paint large cut outs. This is the T-rex outside the door.


I laid out some kraft paper and then drew out the most popular dinos. I outlined it in sharpie and then cut it out.


Unfortunately the large area by kindergarten is carpeted so we have to be extra careful...vinyl tablecloths work well.


Each child got a turn painting a part of the dinosaur.

I think they turned out great and the size of them is having the impact we wanted.


We also painted our fossil casts.


Another project we completed was pastel drawings of dinosaurs on sand paper. The sand paper eats up the pastels a bit but it gives great texture to the piece.

Next week we will be doing our glue dinosaur skeletons...I'll be putting together some templates for that.


Our next unit is Space and Robots so it's back to the drawing board for applicable art projects.

The landscape pastel resist was a hit with Grade 3. I brought in a ton of reference photos and let them decide where they needed to mask out with white pastel. One of the finished paintings was chosen (by the teaching staff) as this year's entry for the school in the annual art contest held by the Catholic School Board. I'm keeping my fingers crossed.

see you next time
gail

Wednesday, May 20, 2009

Working on New Projects


Here is a project I'm testing out for Grade 3. It's from a new Art Book from Usborne and I'm making samples and refining the process so it will work at school. It is a pastel resist for water reflections.


I first tape off some wc paper on my art board.....


Then using white pastel I draw in a moon or sun and where I want my reflection to go....I'm using yellow pastel here so you can see the example. For the lesson I will also have the kids do a pencil sketch for their horizon, middle ground and foreground.


My reflections increase in size as they move into the foreground.


You are then supposed to add some hills in the background......I think for the kids I will have them paint in the sky fully first and then paint in the hills on top....by changing the order you don't have to be so careful maintaining the edges in your hills...much easier for kids.


Paint in your sky....the pastel will resist the paint...try to paint this a bit uneven..this adds character to your landscape.


I added some water marks around the moon/sun to create a bit of a haze.


I added some orange yellow to the water line of the hills as well as a bit throughout the water...this builds some depth to the painting.


You then add some shoreline to your foreground....


add some trees...sponge on some leaves...I added some water marks to my shoreline to give it a bit of texture.


Overall not a bad exercise but I think I need to jazz it up a bit for the kids....I'll keep working at it. This shows the importance of trying out a new lesson before going ahead in the classroom...I typically find I need to refine the procedure and often add extra pizazz for the final piece.


While I have my paints out I try out a glue resist idea for Kindergarten. I think if I have the design printed out for the skeleton the kids should be able to follow it with the glue bottle.


Whenever I try a new technique..new paint..or new paper I cut a sample out and put it in my sample book.

Then when I need some inspiration I can go thru my book for ideas.


For planning lessons or projects I always keep my planning notebook close by. I prefer a graph paper one and I fill it with all my ideas...I have several these. I always have more ideas than time. In fact it's hard to shut off those ideas sometimes so I try to jot it all down. I can then go back..sometimes months or years later to review these ideas.


see you soon


gail

Sunday, May 17, 2009

Recent Potrait Studies


I have been practicing some watercolor portraits in limited palettes...I always find these the hardest for me so I am pushing myself.

Here is a recent one of my daughter.


5"x7" on 180lb wc paper

gail

Friday, May 15, 2009

Silhouettes - Dinosaur Art Project #2


Here is another dinosaur art project that Kindergarten did this week. Silhouettes always look great and help with developing those scissor cutting skills.

MATERIALS REQUIRED:

watercolor paper, we used 90lb
tempera paint, we used the dry cakes
paintbrush
templates (links provided below)
black paper
pastel and/or chalk
glue stick
scissors


Tape off your watercolor paper onto your art board. Art boards are 1/4 inch thick pieces of masonite about 16 x 24. I get the Home depot staff to cut them for me for free from a big sheet.
1 large sheet = 12 boards..perfect size for the student desktop.

I always tape off any painting project..it provides a nice mat edge for presentation.


Starting with yellow, paint a graduated wash for your background sky.

The order we used was yellow,orange,red,purple,blue and then a bit of black for the darkening sky.


While the paint still has some shine sprinkle on some coarse sea salt in the purple,blue,and black sections.

The salt reacts with the paint and causes a small bloom which in our case looks like stars in the distant sky.


Let dry.


I though this one turned out pretty neat....it looks like tornadoes coming down from a stormy sky...


Now using bluish black paint in some ground on the yellow end of your paper. I asked the kids to ensure they left some flat areas where the dinosaurs could stand.


You can see how that salt is causing those small blooms...

Let dry. When fully dry remove the carefully remove the tape.

Now you need to get the dinosaur templates, you can borrow mine

DINOSAUR TEMPLATE 1
DINOSAUR TEMPLATE 2
DINOSAUR TEMPLATE 3

Print off ...you can transfer them onto thin card to make tracers...this works well with a class.


Trace out your dinosaur shapes and cut out of the black paper. Glue onto your painting with the glue stick.


For some extra oomph I had the kids add streaming comets in the sky...they thought that was great...the whole "Doom of the Dinosaur" thing.


Well that's it for now...give it a try.


see you next time
gail

Wednesday, May 13, 2009

Fossil Casts - Dinosaur Art Project #1


Okay these are really easy...so easy I almost decided not to do them but after all the comments from the kids at school who saw the samples we will have to go ahead.

Kindergarten is doing their Dinosaur Unit right now, so I have been putting together some dinosaur projects for them.


MATERIALS REQUIRED:

- salt dough clay (recipe to follow)
- tin can or large glass
- parchment paper or foil
- cookie sheet
- access to an oven
- little plastic dinosaurs
- some plastic ferns or trees
- acrylic craft paint
- paper towel
- mod podge
- paintbrush


SALT DOUGH CLAY RECIPE

4 cups of flour
1 cup of salt
1-2 cups of water (can vary due to air humidity)
This is enough for 8 casts approx. 4 inches in diameter


Mix up your salt dough clay...you want to add enough water to make a soft workable dough. This clay will keep indefinitely in your fridge.


Knead a bit to get it nice and consistent.


Roll out your dough to a 1 inch thickness.


Cut a round...I'm using a large tomato can.... I have one of those safety can openers..the ones that don't leave a sharp edge. It has enabled me to use cans for arts and crafts without worrying about any cuts..truly fantastic!


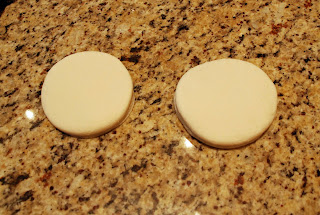
( rounds ready for imprints )


We are imprinting some background foliage for our dinosaurs...I'm using some plastic tree parts that I think are from an old playmobil set.


These are stems from some artificial flowers.


Press into the dough hard enough to leave a nice imprint. We put our foliage around the sides leaving the center for the dinosaur.


You now can imprint your dinosaur....we are using small ones from the dollar store that are about 2-3 inches. Don't push too hard..you don't want to go all the way thru.

You can use this technique to make bug or reptile casts as well...or one that is only ferns and plants.


Place on foil or parchment paper and bake at 350 degrees for about 2 hrs. You want them to be hard.


Let them cool.


Make a glaze by watering down some acrylic paint.


After brushing it on ...wipe it down a bit with a paper towel for a nice antiqued look.


When dry use a thin coat of mod podge to get that shine and to seal them.


That's it....piece of cake.. yet the kids think they are fantastic and have a great time doing them...what more could you ask for.


Give it a try and we'll see you next time with another dinosaur project.
gail