Monday, May 31, 2010

Home Depot

Every year I am fortunate to be able to take the kids from one grade to Home Depot for a field trip and workshop.

This year it was Grade One. 


The staff are always terrific especially Rose!


The kids had a fork lift demonstration.

and a cutting demonstartion using the large saws.

They then had a workshop where they were thrilled to "hammer" and create a " bean bag game".


Today we painted our creations at school with acrylic paint.


Gotta love Home Depot!  Thank you so much for giving 44 Grade Ones the "bestest" field trip ever! (and still a freebie)


Friday, May 28, 2010

White Canary


White Canary - Birds of Prey #1 [2010]
Art by Ed Benes

Tuesday, May 25, 2010

Sunglasses Art Project


I was asked by the teachers at school to come up with an art project to correspond with the CNIB (Canadian National Institute for the Blind) "Shades of Fun" campagin.

On Thursday all the kids at school will be wearing sunglasses during classes to participate

I made a pattern for a pair of sunglasses.  You can use mine, (Sunglasses Pattern), if you want. I can only fit 1/2 on the page so either cut it on the fold for a full pattern or cut out one side, flip, and then trace the other side.  I then traced this pattern onto posterboard.
Cut out the sunglasses.
I then traced around each lens to make a pattern. 

I cut the lens out slightly smaller than I traced so it would fit on the frame.

They fit in like this.

You then pencil in a drawing showing activities where you would wear your sunglasses.

Add some color with pencil crayons, markers, paint.......


Taking some cellophane wrap...... cut out 2 lens pieces silimar in size to the white ones you cut.

Turn glasses over to the back side and glue the cellophane into place.  UPDATE:  While doing 44 pairs of these I found that tape was more effective...the glue does not stick so well to the cellophane.


Glue the pictures on top of the cellophane.

and that's all there is to it.  Give it a try and be sure to wear your sunglasses on Thursday!
On Saturday I was honored to be featured on "Today's Creative Blog" if you get a chance check it out.


Birds of Prey

Birds of Prey are back! From BoP #1 [2010]. Cover art by Ed Benes.

Wonder Woman


From Wonder Woman #40 (2010) - art by Aaron Lopresti.

Monday, May 24, 2010

Spider-Woman


From X-Men Legacy #236. Art by Greg Land.

Tuesday, May 18, 2010

Woven Flowers and Butterflies


Sorry I haven't posted a lot lately...been trying to keep up with the kids!

This is a project I recently completed with Grade 1. 

It is a combination of a circle weaving project I first saw on "oodles of Art Projects" here.......

and a butterfly project from "The Artful Parent".

This is my version so let's get started.


We used small recycled paper plates which were cut with 9 notches. Just cut from the rim to where the flat plate begins.  You need an ODD number in order to weave.

Pierce a hole in the center with a knitting needle.

Cut 9 lengthes of yarn....mine were about 6 inches and put one end thru the hole..other thru the notch and tie the 2 ends into a knot on the other side.
Do this for all 9 notches.


Take some yarn in the color you want to weave with. Tie on at the back and then feed thru the hole in the center.

For the kids I used a large plastic needle to help with their weaving.  I tied the other end of the yarn to the needle to stop it from slipping out.

Start weaving around the center going under one of the pieces of yarn tied in the notch and then over the next one.  When it's time to change yarn just tie right onto the end of the last one.

One thing you have to be careful with is to get the kids to keep the weaving quite loose otherwise it starts to pop up in the center instead of fanning out to the edges of the plate.

Here is an example of the yarn bunching up in the center.

Each child was asked to use 3 colors.


When the kids were finished weaving (this took a while) tie the last end of the yarn off by pulling it to the back thru a notch and then knotting it onto one of the other yarn pieces.


The kids then painted the rest of the plate.  We used liquid tempera paint.  Tempera disks did not work so well as there was a coating on the plate that resisted the paint a bit.  Set aside to dry.


I traced a large circle for each child, about 4 inches larger in diameter than the paper plate.

They painted these in various colors and patterns using disk tempera.

Set aside to dry.


Glue the woven plate to the center of the painted circle for your flower.  You could cut petals into the painted circle if you want.


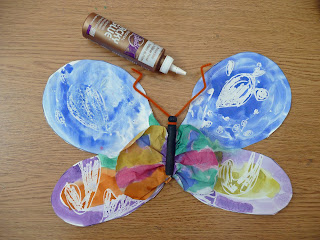
For the butterfly I traced a butterfly shape to heavy paper.


The kids were asked to draw some designs onto the butterfly with white pastel.  Lines, circles, stripes.....


They then painted on top of these designs with disk tempera.


The kids loved this part as their designs "magically" appeared.


After they painted their butterfly we put them into the rack to dry and I gave each of them a coffee filter to paint.

I decided to add the coffee filter to the design to help hold the clothespin in place at the end.

Set aside to dry.


While everything was drying I painted some old fashioned clothespins with black acrylic paint.


I had the kids cut out the butterfly....they picked out a pipe cleaner for the antennae....we put tacky glue on the back in the center and in the front....slide the clothespin in place and then scrunch in the coffee filter.

Let the glue dry and you're done.


Beautiful flowers and butterflies.

Tuesday, May 11, 2010

Painted Kites


Here are some kites that Grade 5 completed with Mrs. Ryan. 


They looked so great in the display case I asked if I could post them on the blog.


Now for this set of kites they used these construction bags as the fabirc for the kites.  It is similar to tarp material and did fray on the edges. 

Mrs. Ryan wanted to use house wrap like tyvec but the roll at the hardware store was too big.  If you can locate a small amount this would be a great option otherwise you might want to sew your edges or fold over and glue down to prevent the fray.


Cut a basic kite shape.  Take 2 sticks, a good cheap option is to use the natural bamboo garden stakes.  Here in Calgary I can get a pack of 24 for a $1.99.

Tape your sticks into place using hockey tape.  You can add a tail with some plastic ribbon which you can also get at the hardware store.

Tie your string on at the joint between the 2 sticks...make sure to tie them together here as well.


Turn over and paint with  acrylic paint.


Great job Grade 5!


I also thought I would include these watercolor pencil  paintings from Grade 4.


Wonderful work Grade 4!