For the last few years the Grade 2's have been making these clay Inukshuk scenes. Studying the Inuit is part of the social studies curriculum and this fits in nicely. This year it is an added bonus that the Inukshuk is the symbol of the Vancouver Olympics.
You need to slice off a 2 inch slab from your clay block. If you don't have access to a kiln you can make one out of air dried clay. Roll your piece out flat until it is about 1 to 3/4's of an inch.
Taking a wooden skewer (best tool for cutting) cut out a nice egg shape approximately 8 inches long.
Dip your finger in water and smooth the edge of this cut. You don't want a jagged cut because after it bakes in the kiln this edge can be quite sharp. (ouch!)
Take your egg and fold it up smooshing the back a bit to form a good supportive seam. You can also turn up the corners a bit to give this shape extra support.
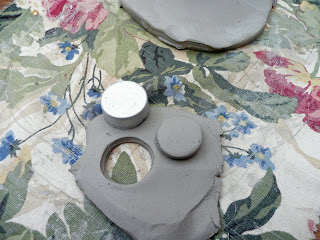
 Using a cookie cutter, old tomato paste can , or in our case a small metal case that normally would hold beads..cut out a small circle for your sun.
You can scratch in some rays for your sun.
The next thing to do is to cut out the rectangular shapes for your Inukshuk. They will be glued (scratch,scratch,water,water) onto the back of the scene so you don't have to make them too thick.
It should look something like this.
Make a body shape and attach to the base.
Roll a head between your palms and then roll a long snake.
Attach this to your head to represent the fur around the collar of the coat.
Make sure to scratch in your face.
Glue (scratch,scratch,water,water) into place onto of the body. Roll a second snake to form the arms and attach as one piece onto the back of the body. I usually have to remind the kids that arms come from the shoulders and not the waist as they always seem to want to attch them there.
You can start adding rocks to make your fire circle. Just scratch the base and don't worry about scratching each individual rock.
Finally they can add some fish.
It should look something like this.
Put the completed scenes somewhere safe and warm to dry.
I usually have them loosely covered with a garbage bag for 24 hrs. (that way they don't dry out to fast leaving cracks) I then remove the bag and let them fully dry out for about 2 weeks. This ensures we have no mishaps in the kiln.
After they have dried out carefully load your kiln and bisque fire.
We decided to paint ours with acrylics to get a nice opague (dense) color but you can also use glaze and fire again.
The kids were instructed to paint the sky and snow first and then all the details.
After letting the paint cure for 24 hrs I'll seal them with a glossy acrylic medium or sealer.
That's it. Sorry this photo is not the best...the skylights at the school always mess me up...good natural light to work under but washes out my photos.
Give it a try and I'll see you soon.


No comments :
Post a Comment