I have made Pysanky since I was about 5 years old. I continue the tradition with my own kids and this year the Grade 3's will be making their own as well.
UPDATE: You can see the eggs they made at the end of my latest post here.
Here is a step by step tutorial on the simple design they will be attempting.
Pysanky supplies are readily available both at Michaels and on the
web. Why not start your own Easter tradition by making Pysanky. My kids love to make a special egg for their teacher as well as close relatives and friends. It's really not that hard and the results are spectacular.
Pysanky is a form of Batik done on eggs. The symbolism is often religious. Themes tend to center around wishes for the coming seasons, (spring, summer) wish for a good harvest, prosperity, hope, charity, fertility, etc.
These eggs will not be edible. You can keep them for years and years
. I have some my great grandma made.
Materials Required:eggs, you want nice large eggs that are well proportioned with no marks, bring them to room temperature and if needed you can wash with a little warm water and vinegarpencilKistka, these are the pens we will make our design withbeeswax, you can get little cakes from Michaels or you may find a natural beeswax candle with no dyes or scentcandlecolor dye, also available at Micheals or on the web...you need YELLOW, RED, BLACK, GREENjarsplastic spoonspaper towelscloth ragoil based shellacwax paper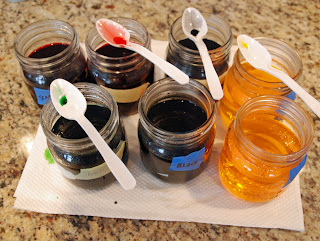
Make up your dyes as per the packet instructions. I make mine up in pint sized canning jars. I put the lids on whenever they are not in use as the dyes tend to evaporate quickly.
I keep all the jars together in a plastic rectangular container so I can move them around quite easily.
Take your egg. We are using raw eggs..don't blow them or boil them. The inside of the egg will eventually dry up. Blowing makes them too fragile and boiling leaves water under the shell that will destroy your design over time, not to mention you will lose a lot of eggs to cracking during the boiling.
We are going to divide the egg off for the design. We will use pencil for a guideline. The pencil marks will wipe off at the end...use fine lines and don't use a eraser if you make a mistake, it will leave a residue that will resist the dye...just leave it.
I work on top of a thick foam sheet (you know that foam that they have for kid's crafts...they have 1/4 inch thick sheets). I then place a paper towel on top. The foam helps protect the egg a bit.

Starting at the top of your egg draw a line all around it lengthwise dividing it in half.
Start at the top again and make a second line lengthwise to divide it into quarters.

Now run a line in the middle of the egg all the way around. Your egg should now be divided into 8 sections...4 on each half.

Now divide it on the diagonal....make sure to continue on the other side.
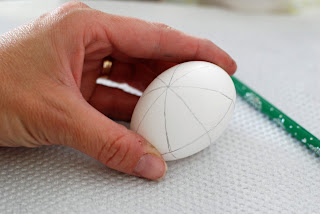

Place a small dot in each section about equal distance from the center. Do this on both sides of the egg.

Connect the dots like this forming a star pattern. Make sure to repeat this on the other side.

Light your candle. Heat up your Kristka in the flame...be careful not to set it on fire...
adult supervision is obviously required for this project.
Heat for about 30 seconds.
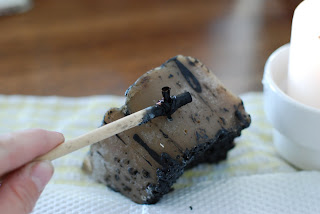
Place pointy end into the beeswax....the wax will melt and fill up the reservoir.
Some books will tell you to place a small ball of wax in the funnel end but this is the way we have always done it and I find the kids can burn themselves placing the wax into the funnel as it stays pretty hot between passes into the flame.
We use beeswax because it turns dark from the carbon in the candle flame. It also has a high melting point so the wax won't melt from the heat of your hand smearing the design.

Apply to your egg. Hold your Kristka like a pencil..I like to have end sticking into my palm...I hold it steadier that way. Try to only make one pass, don't go over it again and again or it will look scratchy. You can test it out on the paper towel covering your work space.
When drawing on the design work in small sections and draw the line away from you...due to the curved nature of the egg you will draw a straighter line this way than drawing it towards you.

Draw over all your pencil lines with the wax....your egg should look like this.
Everywhere we have put the wax will now stay white for the finished product.

Place your egg into the yellow dye...make sure it has cooled down. (you use boiling water to mix the dye).
Use your plastic spoon to carefully lower into the jar. I can't tell you how many times I have accidentally cracked my egg by putting it into the dye too quickly.

When your dyes are new your egg will catch the color quite quickly...check it after 15 minutes.
If you are happy with the color remove from the dye with the spoon and place on some folded paper towel. Blot the egg dry carefully.
Add a teardrop shape in each section of the star. This will now stay yellow until the very end.

Also add some feather lines on either side of your diagonal lines like this.

Repeat on the other side. The feathering of your diagonal lines should meet up like this.

We are using very little green dye for this egg design so, instead of immersing it I am taking a Q-tip and dotting on where I want the green. Place dots above the star tips.
If we were to immerse the egg in the green dye we would have to follow up with an orange dye "wash". Green is one of those funny colors that adversely effects subsequent dyes. By putting your egg in an orange wash you neutralize this.

Cover up your dots with wax...they will now stay green till the end.

Place the egg into the red dye.
When the color looks good remove and blot on a folded paper towel.

Fill in the star with wax...make sure to try and get a good coating...even on my finished egg you will see little spaces where I didn't cover with enough wax...It's all part of this art medium...the little imperfections are what make the egg real.

Cover the star completely on both sides.
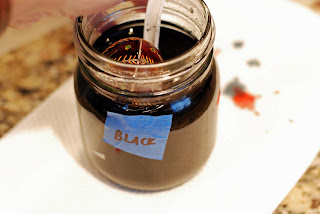
Place your egg into the black dye now.
Wait until the color is acceptable and then remove and blot dry with a folded paper towel.
Keep your paper towels...let them dry out and then reuse...just stick to the same colors each time.

You are now at the reveal stage. Hold your egg into the candle to melt the wax...only do a small section at a time...don't hold it too long in the flame as you can singe it and burn the shell.
Wipe the wax off with your cloth rag. Continue working on small sections until all the wax is removed.
If you get some soot marks from the candle don't worry they will wipe off with the cloth.
You can now shellac your egg to get a real shiny finish. Use an oil based shellac. The dyes are water based and if you use a water based shellac they will smear.....trust me, not something you want to do to an egg you have spent some quality time on. Place on wax paper. When one side has dried turn over to the other side. When the egg is no longer tacky you can store it or put it on display.
Remember these eggs are not edible.
Ta da!
Here is an egg one of my kids made. It was their own design.
I don't have many of theirs to show you as they tend to give them all away.


I hope you give Pysanky a try....it is a marvelous art form.
see you soon
gail