
So I thought the Grade 3's should make a Dragon Puppet for Chinese New Year. They are learning about traditions and celebrations so this seemed to fit.
I original wanted to post this last week but life got in the way with doctor appts. and dentist appts. so here it is now.
This is quite a photo intensive tutorial but don't let that scare you off the results are worth it.

Part 1: Paper mache
Materials Required:
- duct tape..you can use plain old masking or cellophane as well
- cardboard egg carton
- piece of flat cardboard...like from a box
- newspaper or newsprint
- empty frozen juice container
- white glue
- recycled yogurt container to hold glue mixture
- paper towels

Take your egg carton and cut the lid off from the egg compartments.

Cut the lid in half and then cut out 2 egg cups.

Staple the cut ends of the lid like this.

It should now look like this.

Take one page of newspaper or newsprint and roll and crumple into a shape like this. It sort of looks like a snakes head.

Using tape attach it to the top of the lid like this.

Add another piece of tape to the front to make it secure.

Attach your egg cups to either side of your head to look like this.
It doesn't have to be pretty just secure.
This is the upper head of the Dragon.

Take your flat cardboard and cut a lower jaw. Again it is shaped like a snake head. I used my upper head to measure how big to make this.

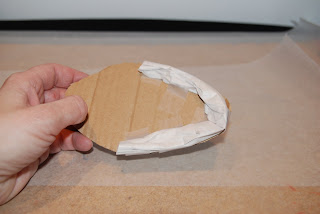
Take your frozen juice container and cut down to the bottom. Gently pull the bottom away from the sides.
Cut the cardboard side piece into two.

You should have three pieces now.

Take a quarter of a page of newsprint and make a roll long ways. Tape together.

Tape onto your bottom jaw to make a gum line. This gives you a space to attach some teeth later.

Mix up some white glue with water, about a 50/50 mix.
Tear up some paper towels into strips.

Begin paper maching. For the frozen juice container piece, coat fully with two layers of mache. Make a lump of mache in the middle of the inside. This will give you a place to attach the stick later.

On the outside you can make some bumps for your dragon if you want. This is his back.
Make sure you "tape down" your bumps with strips of paper mache that overlap onto the main section otherwise your bumps will just fall off.

Mache your lower jaw, giving it two coats to cover.

Mache your upper head. Try to cover all areas. I added some bumps for nostrils on mine.

On the underside make a lump of mache at the end close to where you stapled this piece. Again this will give you a place to attach your stick later.
Place all pieces on wax paper and leave in a warm place to dry. Turn them after a day so they will dry on all sides.
Part 2: Batiking the Dragon Skin
Materials Required:
- Elmer's washable blue gel glue (you can use the clear but it will ooze more so you will loose definition in your design)
- piece of fabric about 6 inches wide and 20 inches long
- wax paper

Draw on with glue a scale design for your dragon skin. Follow the directions from my blue glue batik tutorial if you are not familiar with this technique.
Let dry.
Part 3: Painting
Materials Required:
- acrylic paint for the fabric
- tempura or acrylic paint for paper mache
- paintbrush
- water

When your paper mache pieces have dried paint them completely with the colors and design of your choice.
I decidied to use traditional colors for mine.

Paint your fabric as well with watered down acrylic paint. Let dry, wash out the glue in warm water. Dry again.
Part 4: Assembly
Materials Required:
- glue gun or tacky glue....I used the glue gun because it was faster. Remember to only let an adult use a glue gun, kids ask your parents for help with this part.
- two sticks..I used chopsticks from the dollar store
- white foam for teeth
- red felt
- any trims you want for embellishing
- scissors

Take your white foam and cut out some teeth shapes.
Glue to the inside of the upper jaw.
It should look something like this.
Glue some teeth to the inside of the lower jaw.
Taking an awl or knitting needle punch a hole thru the end of the lower jaw like this.
Make a hole in the upper jaw like this. Don't go all the way thru just even to hold your stick in place.
Make a hole in the back piece thru the lump you made, again don't go all the way thru just enough to hold the stick in place.
Push one stick thru the lower jaw hole.
Put some glue in the hole in the upper jaw and place end of stick that has the lower jaw on it in place.
Hold until glue sets up.
It should look like this.
Cut a tongue piece from the red felt.
Attach the straight end to the upper jaw like this using glue.
Glue the rest of the tongue in place in the lower jaw. This part is a little tricky but you'll get it.
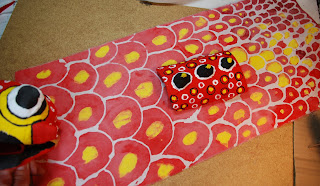
Lay your dragon pieces on your dragon skin and figure out where you want it to go.
Cut the fabric where it will attach to the back piece. I left the tail piece to be longer.
Glue the short piece into place on the inside of the back.
You can trim it to fit or gather it to fit whatever look you prefer.
Glue other end of the short piece of fabric between the upper and lower jaw pieces.
It should look something like this.
Cut your longer piece to taper at the end like a tail.
Attach to the inside of the back piece with glue.
Glue second stick into place into the hole in the middle of back on the inside.
Hold into place until glue sets up.
If you wish you can add some embellishments. I put a fringe on for a beard.
That's it! A working dragon puppet. Well worth the effort. I can't wait to see how the Grade 3's will turn out. They are currently at the painting stage.
see you next time
gail


No comments :
Post a Comment